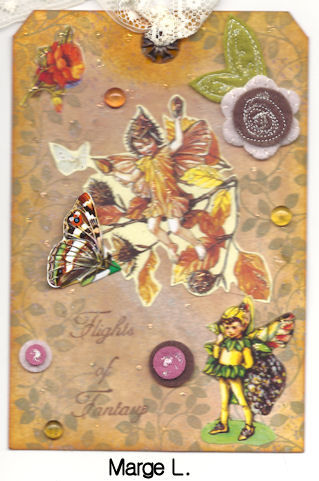
 The theme for my December 4" x 4" page is Fantasy Garden. This person also likes words and poetry. The background is a Vintage Chinese Dictionary page that I sprayed with a a yellow glimmer mist. I cut the Vintage Japanese Vocabulary Card down to size. The woman, flowers, and butterfly images are from collage sheets that I bought on Etsy. I printed the purple/white checks in Excel and trimmed them down to size. I added a little glitter glue to the center of the flowers and popped up every other flower. It's another very simple design. Thanks for stopping by and Happy New Year!
Saturday, December 31, 2011
December 4 x 4 Page
The theme for my December 4" x 4" page is Fantasy Garden. This person also likes words and poetry. The background is a Vintage Chinese Dictionary page that I sprayed with a a yellow glimmer mist. I cut the Vintage Japanese Vocabulary Card down to size. The woman, flowers, and butterfly images are from collage sheets that I bought on Etsy. I printed the purple/white checks in Excel and trimmed them down to size. I added a little glitter glue to the center of the flowers and popped up every other flower. It's another very simple design. Thanks for stopping by and Happy New Year!
Saturday, December 3, 2011
2012 Handmade Calendar Swap
The 2012 Collage Stuff Hand-made Calendar Swap is complete! All of the pages came in on time. That's a first for this swap. See the slideshow below and enjoy the art! There is also a side bar link to my Picturetrail site to view larger photos.


Saturday, November 26, 2011
4 x 4 with a flower theme
 This month's 4 x 4 page was a flower theme. Here it is. It's too dark to take a photo so I had to scan this in. I'll take a photo tomorrow. The background is a vintage ledger page from the 1890's. I put a piece of May Arts 1.5" Crochet Trim down the right hand side. I used just little dots of Diamond Glaze to attach it. The flowers are from a collage sheet that was acquired online. The yellow parts are colored with a yellow Spica glitter pen. It doesn't show up in the scan. The woman is another one of those images that I don't have on a collage sheet yet. The frame is from the Gold Oval Frame Set (German scrap). I colored the woman a little with Copic markers. I added the Tiny Ivory Buttons and used Diamond Glaze to apply them. They are so tiny that it's difficult for me to glue them down without making a mess. I used a gold Copic marker around the edges of the page. I tore the definition of "rose" from a vintage dictionary and edged it with the same gold Copid marker. Thanks for stopping by!
 Friday, November 25, 2011
November ATC Swap
 We have monthly ATC swaps at the Collage Stuff Yahoo Group. This month's swap is to create an artist trading card that can used as an ornament. Here's my design along with some how-to directions.
I started with white cardstock. I made it red with Dylusions Pomegranate Ink Spray. I bought a set of Sizzix Christmas-themed embossing folders and I used the scrolly one on the red paper. After it was embossed I applied some gold paint to a Tim Holtz Foam Blending Tool Refill and applied the gold paint to the raised scrolls and also around the edges. That's it for the background. I have some Christmas sheet music scanned in, so I printed it out in a small size. I made a December calendar in Excel. I toned down the whiteness of these elements with Antique Linen Distress Stain. I still had a little of the red spray ink on my hands, so there's a little red that went on to these two images. I edged the calendar with gold paint. The boy is from the Collage Stuff Altered Christmas Collage Sheet. I sized him appropriately and printed him on white cardstock. After he was cut out, I used various Spica glitter pens on the Santa hat and the greenery wings, but it doesn't show up at all in this photo. The ribbon is on the sale page at Collage Stuff. It's made by May Arts. I added a Tim Holtz Seasonal Muse Token. Before I applied the muse token, I ran some May Arts Red Burlap String through the hole. It's available at Collage Stuff in 9 colors. I really like the burlap string. I used the burlap string for the hanger. As a finishing touch, I rounded the top corners of the ATC and went round the edges of the ATC with more gold paint. Happy holidays!
Tuesday, November 15, 2011
Christmas Postcard
 Here is a new Christmas postcard! It will begin shipping with orders in 2-3 weeks! This image is from the new Holiday Wishes Collage Sheet that will be available for purchase at Collage Stuff soon!
Sunday, November 13, 2011
October ATC
 The theme for the October ATC swap at the Collage Stuff Yahoo Group was a stone angel or cemetery theme. I used images from the Pastel Doors and Broken Collage Sheets. I used Spica Glitter Pens to highlight several things but it doesn't show up in the scan. The text has been sprayed with Sour Apple Perfect Pearls Mist and it doesn't show up either! Another very simple ATC. Thanks for stopping by!
Saturday, November 5, 2011
Calendar Cover
 This afternoon I decided that I had to get to work and start on the covers for the Collage Stuff 2012 hand-made calendar swap. I've been wanting to try out my Dylusions stamps and this was the perfect opportunity. The background is sticky back canvas on chipboard with vintage dictionary text at the top and bottom. I used different sprays - Dylusions (bought them from England!), Glimmer Mist and Perfect Pearls Mist. I used The Crafter's Workshop Circle Grid template for the circles. I really had no plan when I started out with this. The red on the circles was an afterthought as I was just playing with the background. The girl is from the Dependable Dotty Dylusions stamp set and the words are from the "Say What You Mean" Dylusions stamp set. I stamped them with embossing ink on white cardstock and used black embossing powder. I used a small paint brush and the various spray inks that I used for the background to color in the stamped images. I'm making 13 calendar covers and they will all be a little different. Thanks for stopping by!
Lisa
Monday, October 31, 2011
August Calendar Page #2
 I finished the other 5 pages for the August, but changed them up a bit. The main changes were making the background more vibrant and using a cursive text stamp. I applied Washi tape around the edges to finish them off. Thanks for stopping by!
Tuesday, October 25, 2011
August Calendar Page
 At the Collage Stuff Yahoo Group, we're doing another handmade calendar swap. I always make the covers. This year we couldn't get enough people to take all of the months, so I'm splitting the month of August with another group member. I decided I wanted to try using the Ranger Sticky Back Canvas. I carry the 8.5 x 11 sheets at Collage Stuff, but for the 4 x 6" calendar pages, the 12" size is better. I got my 12 x 12" canvas in, got out the spray inks and mica sprays and ruined a 12 x 12 sheet of canvas. Ugh! Then I decided that it would be better to cut the canvas into 4 x 6 pieces and go from there.
 I'm in love with The Crafter's Workshop Zinnia template. I used gold paint and this template in three different places on the canvas. Then I sprayed pink and green Glimmer or Chalkboard Mists. I have a large letter stamp. I inked it up with Library Green Archival Ink and rolled just a little of the stamp on the canvas. I didn't use an acrylic block. I can get smaller impressions from a large stamp this way. I really liked my background and then I couldn't think what to put on it!
I found the bathing beauty image on the Collage Stuff "By the Shore" collage sheet. It's black and white, but I colored it pink in PSP X2 and added the little frame. I printed this out as a transparency. I looked through a vintage children's songbook and found this music. I scanned it in and sized it down. It was sprayed with the same green mist. I used Diamond Glaze to apply the transparency to the music. I printed out the little calendar in Excel and again, the green mist. I added the Gold Mini Sun and Gold Fish German Scrap (available at Collage Stuff). I used the new Ranger Glue n Seal to attach everything to the canvas. It comes in a little jar with a brush, so it's very easy to use (also available at Collage Stuff). To finish off the edges of the canvas, I used the Library Green ink pad around the edges.
I liked working on the canvas. It's very sticky and it really stuck to the 4 x 6" chipboard base. It's not going anywhere! I have 5 more of these to do and then it's time to design the calendar cover!
Thanks for stopping by!
Saturday, October 22, 2011
Vintage Children 4 x 4 Page
 This one is called "The Traveler"! It's a 4 x 4 page that I finished tonight. For the background I used one of the new The Crafter's Workshop templates (available at Collage Stuff), the Zinnia template. The background is a mish mash of a copy of a vintage ledger page, gold paint and blue ink spray on the template, part of a map over the completed template design, gesso over everything and more blue spray. The words "The Traveler" are from a vintage children's songbook. I used some Antique Linen Distress Stain to tone down the text just a tad. I colored an orange UK bus ticket red with a red Sharpie. The vintage pen nib, gear, and arrow spinner are from Collage Stuff. I found just a little bit of some Seven Gypsies text rub-ons in my stash and applied them. The "in the public eye" was from a Green Paper Packages collage sheet. The boy image and butterfly wings are from a Land of Nod Studios collage sheet. Thanks for stopping by!
Thursday, October 6, 2011
Witchy Sisters ATC
 I needed to make some more ATC's for the Collage Stuff September ATC swap, so here are the "Witchy Sisters"! The papers and little poison label are from the Teresa Collins Haunted Hollows 6 x 6" paper pack. I love the 6 x 6 paper packs with the coordinating papers. So easy to combine papers for great backgrounds! The girls are from the new "Simply Sisters" collage sheet. The witch hats on are several different Collage Stuff collage sheets. I used orange Baroque Border German Scrap at the bottom and used the new tiny buttons as fun accents for the border. The words were made at the Acme Labelmaker website. Everything but the German scraps/buttons on this ATC is edged with a black Copic marker. I hope the "Witchy Sisters" inspire you to create your own Halloween art! Thanks for stopping by!
Saturday, September 24, 2011
White 4 x 4 Page

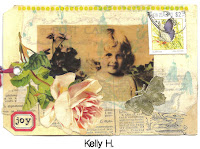
This month, I'm supposed to make a "white" 4 x 4" page. How did I do this? I started off printing a background from a background sheet that I got as a member of the Green Paper Packages Collage Club. You can't see it all now really. It was kind a of light green floral design. I painted it with white gesso. The floral image is from a postcard that came from the Green Paper Packages Collage Club. I cut it out, glued it down and put white gesso over it. I overstamped the completed background with the Collage Stuff Stylish Background stamp and Tea Dye Distress Ink. The "carte postale" and part of the red stamp (1.25 Gulden) are also from a Green Paper Packages Collage Club collage sheet. The Marie image is one that I bought at Etsy. The gold ivy frame is from Collage Stuff and I covered most of it up with white gesso. I put white gesso on almost everything. The little pearls are Prima. I cut up the pearl designs to get the sizes and look that went with the design. I used Vintage Photo Distress Stain around the edges of the 4 x 4". When I thought I was done with this, I looked at it and decided that it still could use something. I stamped with a text stamp in the bottom left corner with Tea Dye Distress Ink. Finished! It's probably not as white as it should be, but I like it!
Saturday, September 10, 2011
Teacher's Pet ATC

The theme for the August Collage Stuff ATC swap was "Back to School." Of course, I am always struggling to get mine done. Here's my entry, "Teacher's Pet". I manipulated all of the images I used digitally. The girl is from the "Back to School" collage sheet. I colored the image in PSP X3. I also cleaned up the slate a little bit and added "a b c" digitally. The background collage sheet was originally yellow, but I adjusted the color to pink. The school house ("Institutions of Learning" collage sheet) was originally red, but I adjusted it to a pinkish color too. Everything was glued down. I used wonder tape to apply the Matte Olive Lace German Scrap Border at the top and bottom. I used the Ame Label Maker website to generate the "teacher's pet." The label maker doesn't like punctuation, so it left out the apostrophe. I can spell! I edged the sides with a black Copic marker. The black number is a Tim Holtz Typewriter Alpha Part. They are self-stick. Thanks for stopping by!
Sunday, September 4, 2011
Madeline Variation
Here's a variation on the background technique using the circle grid template from The Crafters's Workshop. I glued a vintage dictionary page to some
  cold press watercolor paper and sprayed it with a lime green glimmer mist. I should have given it two coats, but one is OK too. I used the circle grid template with an orange glimmer mist. Once that dried, I p
 ut the template back in place and used a black Spica glitten pen to highlight the orange circles. I used the Collage Stuff Stylish background stamp with black paint to overstamp the background. To add a little more interest, I highlighted some of the black paint flourishes with a white Ranger opaque pen. For these ATCs I used the Black Spider Web German Scrap cut to fit the ATC.s The orange base was made by spraying white cardstock with the orange glimmer mist and overstamping with black ink and a crackle stamp.
 the circle grid template from The Crafters's Workshop. I glued a vintage dictionary page to some
  cold press watercolor paper and sprayed it with a lime green glimmer mist. I should have given it two coats, but one is OK too. I used the circle grid template with an orange glimmer mist. Once that dried, I p
 ut the template back in place and used a black Spica glitten pen to highlight the orange circles. I used the Collage Stuff Stylish background stamp with black paint to overstamp the background. To add a little more interest, I highlighted some of the black paint flourishes with a white Ranger opaque pen. For these ATCs I used the Black Spider Web German Scrap cut to fit the ATC.s The orange base was made by spraying white cardstock with the orange glimmer mist and overstamping with black ink and a crackle stamp.
Saturday, September 3, 2011
Marvelous Madeline


This is Madeline. I like naming the people on my collage sheets! Let's start with the background. I used cold press watercolor paper and the circle gird template (The Crafter's Workshop). I applied gold paint with a gold paint dabber. I made sure this was dry and then sprayed orange colorwash spray and orange glimmer mist. When that was dry, I inked up the Collage Stuff Stylish Background stamp with black paint and stamped this over the dots. The colorwash/mists don't stick to the gold acrylic paint dots. The acrylic paint acts as a resist. On to the ATC. I cut some black sparkly cardstock to ATC size, and glued on some text from an old history book, but not to cover the whole thing. Then I sprayed the text with lime green glimmer mist. The little jack-o-lantern man is from the new Catnip Designs "More Victorian Halloween" collage sheet. I sized him a bit smaller than he is on the collage sheet. I edged this with a black Copic marker. I cut the prepared background down, so I could angle it across the ATC and edged it with black ink and the ink blending tool. Prepared background glued down, little jack-o-lantern man glued down, next Madeline and her hat. The word "Halloween" is from the Cursed collage sheet and I colored it green with a Copic marker and edged it with a black Copic marker. I colored 3 clear jewels with the same green Copic marker and put them in 3 corners. I hope that you're getting some inspiration for your own Halloween art. I've been having fun creating!
Glamorous Stella

I think Stella is really pretty, so I wanted to glam her up a bit. I used the background that I had prepared in the previous post, added Stella and word "enchanted" from the Cursed collage sheet. Then I cut some black cardstock in a wave fashion and glued it to the side/bottom as shown. I piled on some crackle accents (didn't want to go find another glue) and applied the Gold German Glass Glitter. It's very sparkly and beautiful. After the glitter dried and I was sure it wasn't going to fall off, I colored a Prima craftable flower and a clear crystal with a Copic marker and added it to the corner as shown. I think this is a more glamorous setting for Stella.
Meet Stella

 Today I decided I would take some of the new Crafter's Workshop templates and experiment. My first two experiments are going in the bin - too many colors, uck, all ran together etc. The background on this ATC is a successful experiment. I took a sheet of cold-press watercolor paper and used the Harlequin Crafter's Workshop template. I sponged gold acrylic paint (gold paint dabber) to make the diamonds. I dried that with my heat gun and then sprayed some plum colorwash and pink chalkboard glimmer mist over the diamonds. The paint acts as a resist and the sprays wipe right off. I dried that with my heat gun. Then I placed the template back over the gold, but offset it and applied black ink using an ink blending tool. I used a Ranger Opaque White Pen to make some highlights on the black diamonds and drew all of the white squiggles in on the purple/pink parts. This is a a very busy background, so it doesn't need a lot of stuff on it. The woman image is from the Cursed collage sheet. I'm calling her Stella. She seems like a nice ghoul with a green complexion! I outlined Stella and her hat with a black Copic marker. The little flower is a Prima Carftable Flower colored to match with a Copic marker. I colored the clear jewel with the same Copic marker to match the flower. The words are from the Cursed collage sheet. I colored them with a Copic marker and softened the edges with black ink and the ink blending too. The ric rac is the May Arts 1/8" black ric rac. I used red line tape to apply it. I used glue dots to apply the Spider sequins and flower. I used the ink blending tool with black ink to smudge the edges of the ATC.
 Sunday, August 28, 2011
Guest Artist - LuAnne B.
 Wow! I adore these ATCs created by LuAnne B. using the "Cursed" collage sheet. Thanks LuAnne for sharing your art.


Saturday, August 27, 2011
Cursed Collage Sheet

Here's a new collage sheet for Halloween, "Cursed". I had fun changing these pleasant women into their cursed equivalents. These images were taken from vintage cabinet cards. Which one is your favorite? Mine is the girl with the green skin and pink hair.
Wednesday, August 24, 2011
New Collage Sheet

Here's a new collage sheet, Sweet Sisters. It's available at Collage Stuff now in the paper and digital formats!
August 4 x 4 page

In one of my Yahoo groups, we're doing a 4 x 4 swap. My page for August has a Butterfly Garden theme. First I made the digital collage. My friend LuAnne sent me some photos and of course, I got to work ASAP to edit them. She sent me these cute girls. I colored their faces, hair and hands digitally. I cut them out of the photo and used a scan of a vintage childrens' book for the backdrop. I made it just a little pink. Then I added the butterflies digitally and adjusted the color to make them pink. One digital collage done and then printed out to the correct size. I just got in the Authtique Uncommon 6 x 6" paper packs and I've been itching to use this paper. This was the perfect opportunity. I overstamped the 4 x 4" part with a stamp from the Tim Holtz Papillon stamp set, the text one. I like the black/white checks, so I cut some of them out (homemade in Excel) and placed 3 as shown. The grey/pink paper is also from the Uncommon paper pack. I edged everything with a black Copic marker. I glued down all the paper parts and found my stash of Mica tiles. I glued the Mica tile down with Diamond Glaze. I added the lace and button with glue dots. The stickers are from the Authentique Diction Stickers from the Uncommon collection. I edged the stickers with a black Copic marker before applying them. I will be working on a new collage sheet featuring these girls in different sizes with different backgrounds. Thanks for stopping by!
Saturday, August 20, 2011
In color now!

 Here's a color version of a postcard that I created two or three posts back. I recreated the original and used my PSP X3 to colorize the image. I was reading some tutorials tonight and decided to try colorizing a black and white image. I've tried before with little success, but I feel like I've succeeded this time! I'll send this off sometime soon to get this made into a Collage Stuff postcard too. Be sure to check out the tutorial at http://bohemianitkupilli.blogspot.com/2011/08/duuni-koekaniineille-guinea-pigs-wanted.html
Wednesday, August 17, 2011
New Postcard

Here's a new postcard that will be shipping with Collage Stuff orders in a few weeks. I used the "Lazy Days" collage sheet and some fish from the "Beneath the Sea" collage sheet. The fish weren't purple to start out, but they were when I was done! I added the postage stamp, and text digitally.
Sun and Sand ATC 2

I decided that the sequin shells were too plain, so I added a clear jewel to each one. Now they seem finished to me and here's another ATC.
Sun and Sand ATC
 I'm always behind on my art stuff. The July Collage Stuff ATC swap is a beach theme, "Sun and Sand." Here's my design. I took a white matboard ATC blank and sprayed it first with Blue Patina Perfect Pearls Mist. I dried it with my heat gun as I can't stand around and wait on anything to dry! Then I sprayed Blue Raspberry Perfect Pearls Mist and dried that with my heat gun. The PP Mists are very transparent and soft. I love them! I always have some bubble wrap around, so I dabbed some gold paint on the bubble wrap with a Ranger Gold Paint Dabber (love this) and pressed the misted ATC blank onto the paint randomly. I scanned in an old dictionary page that had "beach" at the top, sized it, printed it out and trimmed it to size. I used the gold paint dabber around the cut edges. The girls are from the "Lazy Days" collage sheet. I haven't used these images before and thought it was about time I did. I also edged it with the gold paint dabber. I painted the inside of 4 Clear Iris Shell Sequins with you guessed it, the gold paint dabber. I found out quickly that the sequins melt with the heat gun if you aren't careful. I was trying to get the paint to dry faster. I used glue dots to adhere the sequins in the 4 corners. I like numbers and random stuff, so I cut up a yellowish UK bus ticket and used the numbers as shown. I dug through my stash and found the gold alphabet stickers to make the word "play". The ATC base is also edged with the gold paint dabber. Thanks for stopping by!
Friday, August 12, 2011
New postcard

Here is a new postcard. I design the Collage Stuff postcards digitally using Microsoft Digital Image Pro and PSP X2. The background is a vintage photo of New York City, from the 1940-50's. The woman is a civil war era figure that I don't have on a collage sheet yet. I added the gear, dots, graph and alphabet strings digitally. This postcard will be begin shipping with Collage Stuff orders in the next few weeks.
Wednesday, July 20, 2011
CHA day 2
Today was my last day at the show. I waited in line for about 30 minutes to do the make-n-take at the Advantus booth with the Tim Holtz stuff. Tim was at the booth helping with this project. The birdcage is new and the back pops off! You can collage inside the bird cage. There is a little photo of an owl and some silver tinsel in the birdcage. There is a chain tassel and a bauble that has been colored orange with alcohol inks. There's also a little piece of black tulle that I should have cut off shorter before I left the booth. The chain is the Tim Holtz lace chain. The bird cages are versatile. You can put whatever you like inside them.

 I signed up for one class and it was a "Gypsy Journal" class using the Twinkling H20's and other similar products. I didn't get mine finished, but here's a photo of the class sample.

 I signed up for one class and it was a "Gypsy Journal" class using the Twinkling H20's and other similar products. I didn't get mine finished, but here's a photo of the class sample.
Another interesting thing I saw today was the Theresa Collins Stamp Maker. I have watched online videos about it and today I saw it in person and it took about 5 minutes to make a clear stamp. Part of the process had already been done, so what I saw took about 5 minutes. I am thinking of purchasing this so that I can make custom stamps for the backs of ATC's again.
Back to Houston tomorrow! Thanks for stopping by!
Tuesday, July 19, 2011
CHA Day 1 General
I'm here in Chicago at the CHA show. Previous posts for today talk about the Dylusions stamps and Crafter's Workshop stencils. Now some general stuff. I ordered in the new Tim Holtz stamps, the new Idea-ology stuff, a few things from Maya Road, a few new things from Rose & Meyer (German scrap), some paper packs for Halloween and Christmas, Picket Fence Distress Stain, the 4 ounce jars of Rock Candy Crackle Paint and a few other misc cool things. Tomorrow is my last day at the show and I have one class in the afternoon. Stay tuned for more news from the CHA show tomorrow night! Thanks for checking in!
CHA Day 1 Crafter's Workshop

 I made the sample tags above at the make-n-take table at Crafter's Workshop. We were provided tags, lots of their yummy stencils, paints, color wash, distress inks, and acrylic paints. They let us go wild with the supplies after a few suggestions. Of course, whenever I am at a class or whatever, the first couple of things I make are usually not to my liking. After playing with the stencils some more and gathering colors up, I came up with the bingo tags above. They are made only with stencils, distress inks, colorwash spray, white acrylic paint and copper lumiere paint. First I stenciled some big white circles with white paint. I dried those with a heat gun to make sure they were dry. I sprayed red colorwash or I could have used red distress stain or even a red distress ink pad. The acrylic paint acts as a resist. After I applied the red colorwash spray, I just wiped it off the white circles. Next I took the bingo stencil and used black distress ink with a blending tool. Next, I used the punchinella stencil (above) with black distress ink and copper lumiere paint. The stencils are very versatile and I ordered a lot of them! I think these stencils are great for backgrounds!
CHA Day 1 - Dylusions!


 Dylusions! I saw these samples at the Stamper's Anonymous booth and I was amazed! These stamps are wonderful. Later on at the Ranger Booth, the creator of these stamps, Dyan Reaveley, was demo-ing. She used the Distress Stains like watercolors to color stamped images. I ordered several of these stamp sets. Check out Dyan's blog here.
 Saturday, July 2, 2011
June ATC for Collage Stuff Swap

Here's my ATC for the June Collage Stuff ATC swap. The theme is vintage children. For the background, I covered a chipboard base with vintage dictionary text and then overstamped it with a crackle stamp with brown ink. Next, I used one of the Tim Holtz Mini Labels dies to cut out the center. I used a bronze Copic marker to edge the cut-out and the sides of the ATC. The girl image can be found in the Collage Stuff Vintage Children Collage Pack. I colored 3 Prima Mini Craftable Flowers with Copic markers and glued black mini buttons in the centers. I put Tim Holtz Filmstrip Ribbon across the bottom of the ATC and arranged the flowers in the lower right corner. I found some little metal clock faces in my stash and cut them up. If you look carefully, you can see the little bit of clock face in the corner under the flowers. To balance the flowers, I glued the black tiny buttons in the opposite corner. I'm liking the Tim Holtz mini dies more and more. I've been thinking about trying the butterfly die on ATCs too. Thanks for stopping by!
Saturday, June 25, 2011
June 4 x 4

In one of my yahoo groups, we're starting a new swap and it's 4 x 4 pages. I don't own many dies, but I've had my eye on the Tim Holtz Artful Dwellings die. I decided to go ahead and get one. The house is from the Artful Dwellings Die and I used the Tim Holtz Mini Openings Die to cut out the windows in the house. I glued scrapbook paper on to chipboard and cut that out with the dies. I used Tim Holtz tissue tape to cover the "roof" and the edges of the house. I used a green Copic marker around the edges of the house on the tissue tape. I also used the same green Copic marker to highlight the little windows. When you turn the page over, you can see some of the roof sticking up, so I covered the back of the roof with the tissue tape. The images behind the windows are from the Collage Stuff "Charmed" Collage Sheet. I put a mom, a dad, and 3 kids in the windows. The number five is cut from a vintage Flinch game card. The flowers are Prima craftable flowers that I colored with Copic markers. I used glue dots to secure them. I printed the words "home sweet home" at the Acme labelmaker website. For the background... I cut some scrapbook paper to 4 x 4 and used the same tissue tape around the edges. Now for the little black and white squares. I made a spreadsheet in Excel that is black and white checks. I print it out and try to cut in the middle of the checks. Since I have this in Excel, I can make whatever colors of checked paper I like, by changing the colors of the cells. I glued down my checks and put little brad flowers in the corners. The house is popped up a little as I used foam mounting tape to secure it to the background. I had fun making this little house 4 x 4" page. Thanks for stopping by!
Thursday, June 16, 2011
Postcard Tag Swap Entries
The postcard tag swap at Collage Stuff is drawing to a close. I will be swapping the tags out this weekend. I scanned in one tag from each participant! Enjoy and many thanks to the participants.


Subscribe to:
Posts (Atom)


